Showing posts with label composting. Show all posts

Saturday, April 11, 2009

Ikea Hack: Stylish Vermicompost Bin for a Small Space


I was driving through Chicago a couple weekends ago, when my car had trouble. It kept pulling toward a big blue and yellow building full of wonderful Scandinavian delights, and then it just stopped. Well, what was I to do? I had to go inside.

Inspiration hit when I saw the Trofast line of storage furniture. We just remodeled our kitchen last fall (yeah, we still haven't had a back-splash installed but I'm getting there, I swear!): the cabinets were painted gray, and we're using red and orange as our accent colors. The white storage furniture with red bins was another worm bin waiting to happen!

I don't like most of the commercial worm bins out there, for a number of reasons. When looking for a suitable container for a new bin, I look for the following:

  • Depth. This is perhaps the most important, since I want to make sure I can cover food scraps with a thin layer of coir or shredded newspapers. You also need to add some ventilation, so it has to be deep enough to accommodate some screened vent holes, but not so deep that it gets no air. Somewhere between 8 and 12 inches is about right.
  • Volume. The bin should be big enough to accommodate the amount of kitchen scraps you expect to generate. If you cook a lot, you're going to need a bigger bin than someone who goes out to eat most of the time.
  • A lid. You need to cover the worm bin, not only to keep the worms in, but to keep it from drying out.
  • Looks. I keep my bin in the kitchen where it's most useful, so I don't want something that looks like a worm bin. If you can vermicompost without anyone knowing, you're doing it right.

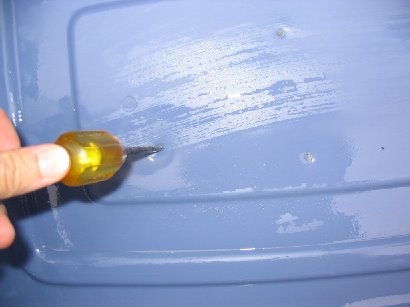
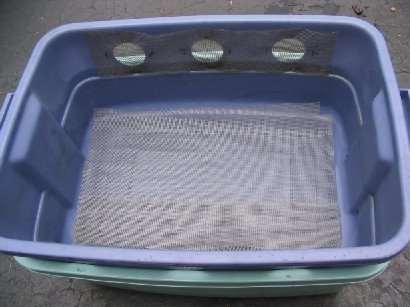
To prepare the bin, step one is to drill some vent holes and cover with screen. I tried something different this time, by adhering the screen with silicone caulking instead of with staples like I did last time. The staples from my old bin, though starting to rust, are still intact. But because the staples don't provide a seal, worms crawl under the screen, and sometimes they even escape out the vent hole.

If you do use silicone, let it cure for at least a week before filling up your bin. I don't know if it was a reaction with the plastic of the bin or just an old tube of sealant, but that stuff stayed sticky for a long time.

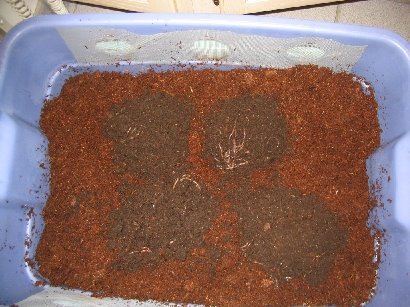
Next, I added about an inch of coir to the bottom of the bin. If I were creating a bin for the first time, I would have added 3 or 4 inches of coir, but since I was transferring material from another bin I didn't need a lot of bedding. I buy the bricks, which are sold at several feed stores and garden centers around here, and add water to expand them. I don't put any drain holes in the bottom of the bin. The coir is there to keep the bottom from getting too soggy and to provide some material the worms can crawl through, and I've found that as long as you don't overdo the watering, drain holes are unnecessary.

After the coir, I added kitchen scraps that I had saved for this project, along with some partially composted stuff I wanted to move from my old bin.


Then I covered it all with a thin layer of shredded newspaper. The newspaper makes good bedding for the worms, and it also helps to regulate moisture, just like mulch in your garden.


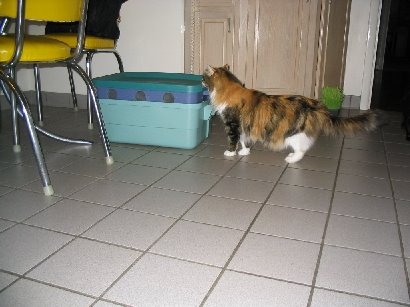
I wetted down the newspaper, then after a thorough inspection by the cat my bin was ready to go. This particular Trofast unit is three bins high, so I used two of the bins for vermicompost, and I use the top bin to hold some extra newspaper and a garden trowel.

Every week or so, thoroughly mix the material in your worm bin with a trowel. This keeps it aerated and incorporates any additional scraps that you've thrown on top during the week. It also lets you asses the health of your bin. If there are any unpleasant, rotten odors, then the bed is too wet: add some more shredded newspaper. If the bin is too dry, add some more water.

Let the bin dry out a bit before harvesting. You don't want it to be dry enough to kill your worms, but if it's too wet and muddy it's almost impossible to do anything with. I haven't found a good way to harvest vermicompost other than picking the worms out by hand (I do wear gloves, not because I'm opposed to touching worm castings, but because I hate to get dirt under my fingernails), and putting it through a screen.

If you have a larger bin like my Rubbermaid one, you can push all the stuff to one side and just add scraps to one half of the bin. Many of the worms will eventually congregate on the new side, but you'll still find plenty in the finished material as well. For my new two-bin system, I plan to just stop adding scraps to one bin several weeks before harvest.

Stacking Vermicompost Bins -- A Critique


My preferences for worm bins run contrary to much of what is on the market right now. If you search for a home vermicomposting system, you'll more likely than not come upon one of the continuous-flow type systems: the kind with stacking trays with vented bottoms. They're supposed to make harvesting the vermicompost easy: start with material in the lower bin, then when that is full add to the next level, etc. The worms supposedly finish the lower bin, then crawl up to the next layer for the fresh material, leaving black gold in the lower bin.

In my house, however, an expensive stacking vermicompost system is nothing more than messy, fruit fly-infested vermicide on the grandest scale. Why?

  1. The bins are too shallow: they dry out easily. Worms can handle too much water, but not enough is deadly.
  2. However, if you keep the bins moist enough, then any fruit fly within miles is immediately alerted to the brand new, multi-level condo created (they think, if fruit flies think) just for them. Again, the shallowness of the layers is the issue: you can't properly cover anything you put in.
  3. The worms don't cooperate, either. In my kitchen, the worms were just as likely to move to a lower layer than to a higher one. I was forever fishing live and drowned worms from the water-collection layer at the bottom of the unit. And a "finished" layer was still as full of worms as an unfinished one.
  4. Talk about a mess! Each layer has a grid on the bottom. When you lift up a layer, either to check on the worms or to harvest, you have a box with worms hanging out the bottom, and dirt all over. Where do you put it? You can't set it down, or you'll smash all the worms in transit from one layer to the other. So any time a layer was lifted, it became a two-person operation: one to hold the top box mid-air, and the other to work with the material below.
  5. And finally, the bins, in addition to being too shallow, were just to small to handle fruit and vegetable scraps for a couple who eats a lot of fruits and vegetables.

Does this mean you shouldn't vermicompost? Absolutely not! It's actually much easier, cheaper, and less messy than the expensive worm towers would lead you to believe. I just created a new vermicompost bin (will post pic right after this), but the old cheap bin I made from a Rubbermaid container is still the best bin I've ever used.

Saturday, March 28, 2009

Pathogens in Commercial Compost

seedlingsInteresting article in the the Franklin County, Maine Bulldog about compost made at huge commercial facilities. It's not one of those "organic guys are crazy and look how dangerous it is to do stuff without chemicals" articles, but is well-written.

It seems that for commercial composting facilities, size does matter, and smaller is better. At some point, the piles are too large to properly turn, and pathogens like E. Coli, and fecal coliform bacteria are not killed.

http://www.dailybulldog.com/db/?p=1791

What's an organic gardener to do? Make your own! In a backyard pile, you can control what is used: the pathogens mentioned in the article are more likely to occur when animal products like manure are used. You can also monitor the pile to ensure it heats up properly even if you do use manures.

Monday, July 7, 2008

Vermicompost (worm compost)

I wrote this awhile back on my other blog, but am pasting most of it here because it's garden-related. I've been vermicomposting indoors for about two years now, and occasionally someone asks me how to start. So here's how my favorite bin was made:

I started out with two Rubbermaid bins. I have removed the labels long ago so I can't tell you how many gallons they are, but they are approximately 16" x 20" x 9" deep.

I drilled three large holes in each side near the top of one of the bins, and stapled window screen material over the holes. If I had to do it over again I'd bond the screening on using some silicone caulking material. If you do that, make sure you let the caulking cure for awhile (I'd give it a week) until it no longer smells like vinegar.


Punch several holes in the bottom of the same bin that has the other holes so any excess water can drain.


You will end up stacking the bin with the holes on top of the second bin. However, you will probably need to put something in the bottom of the intact bin so they don't nest too tightly together: you don't want to block the screened holes from the first bin. I found a small dish shelf, but you could just as easily line the bottom with a few rocks. Don't make it too heavy or your bin won't be very portable.


Stack the two bins together and lay some screening material in the bottom of the top bin to keep the worms from falling out of the drain holes.


Now it's time to fill up your bin. I used coir (expanded in water to the consistency of a moist sponge) as my main bedding material. I usually keep some of this material around to make potting soil (I hate potting soil with peat moss), so it was handy. I made that initial layer several inches deep, then buried some of my kitchen scraps in it. Don't use meat or dairy, but fruit & vegetable scraps, coffee grounds, tea bags, etc. are ok. I also added a little bit (~1/2 a trowel full) of compost from my pile outside to help the kitchen scraps break down more easily. Add some water until the coir is damp: worms need moisture to survive. Then dump your worms on top. I used 500 red wigglers I bought from a bait shop. If they have two different types of red wigglers, get the small ones: they are cheaper, and they are supposed to be better for composting.


I shredded some newspaper on top of the coir, and sprayed it with water. That seems to keep the coir from drying out too fast, and it's more material for the worms to work on. You may want to keep the lid off for a couple hours in a brighly lit room to make sure the worms dig down into the coir instead of trying to crawl out of the bin. They seem to get confused when they're first put in there, and if the bin is in the dark right away they are just as likely to crawl up the side of the container -- or out the screened holes -- as they are to dig down. Once they made it into the coir I haven't had any problems with escapees.

How much do you feed your worms? I have yet to measure anything so I can't give you a precise answer. You want to make sure whatever you add can be buried within your bedding material because you don't want to stink up the place or overwhelm the worms. I've been checking the bin every few days and if what I put there before has been mostly broken down then I'll add a little more.

Getting the bin cat-scanned is optional -- for the worms. Maybe not for the cat.

Wednesday, March 5, 2008

Worms!

Last weekend's near-80-degree weather is just a distant memory with our 10+ inches of snow outside. This winter -- our third in St. Louis -- has by far been the coldest and snowiest.

I vermicompost in my kitchen, and last summer I also started an in-ground worm bin outside. Before winter, I piled 3-4 feet of shredded oak leaves on top of the bin with the hope that it would provide some insulation: prior winters weren't all that cold, at least not for any extended period of time. I was pleasantly surprised last weekend to discover that not only have the worms survived this cold winter so far, but they appear to have thrived!

After yesterday's snowfall, I'm probably more concerned about flooding them out when it melts than I am about the cold, since the snow provides a lot of insulation and it's not the bitter cold we had earlier.