I started out with two Rubbermaid bins. I have removed the labels long ago so I can't tell you how many gallons they are, but they are approximately 16" x 20" x 9" deep.
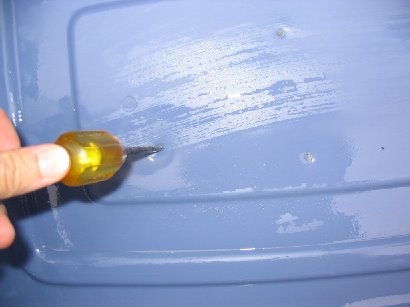
I drilled three large holes in each side near the top of one of the bins, and stapled window screen material over the holes. If I had to do it over again I'd bond the screening on using some silicone caulking material. If you do that, make sure you let the caulking cure for awhile (I'd give it a week) until it no longer smells like vinegar.


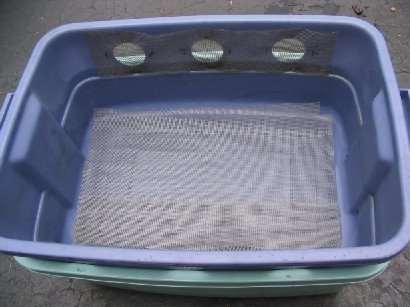
Punch several holes in the bottom of the same bin that has the other holes so any excess water can drain.
You will end up stacking the bin with the holes on top of the second bin. However, you will probably need to put something in the bottom of the intact bin so they don't nest too tightly together: you don't want to block the screened holes from the first bin. I found a small dish shelf, but you could just as easily line the bottom with a few rocks. Don't make it too heavy or your bin won't be very portable.

Stack the two bins together and lay some screening material in the bottom of the top bin to keep the worms from falling out of the drain holes.
Now it's time to fill up your bin. I used coir (expanded in water to the consistency of a moist sponge) as my main bedding material. I usually keep some of this material around to make potting soil (I hate potting soil with peat moss), so it was handy. I made that initial layer several inches deep, then buried some of my kitchen scraps in it. Don't use meat or dairy, but fruit & vegetable scraps, coffee grounds, tea bags, etc. are ok. I also added a little bit (~1/2 a trowel full) of compost from my pile outside to help the kitchen scraps break down more easily. Add some water until the coir is damp: worms need moisture to survive. Then dump your worms on top. I used 500 red wigglers I bought from a bait shop. If they have two different types of red wigglers, get the small ones: they are cheaper, and they are supposed to be better for composting.

I shredded some newspaper on top of the coir, and sprayed it with water. That seems to keep the coir from drying out too fast, and it's more material for the worms to work on. You may want to keep the lid off for a couple hours in a brighly lit room to make sure the worms dig down into the coir instead of trying to crawl out of the bin. They seem to get confused when they're first put in there, and if the bin is in the dark right away they are just as likely to crawl up the side of the container -- or out the screened holes -- as they are to dig down. Once they made it into the coir I haven't had any problems with escapees.
How much do you feed your worms? I have yet to measure anything so I can't give you a precise answer. You want to make sure whatever you add can be buried within your bedding material because you don't want to stink up the place or overwhelm the worms. I've been checking the bin every few days and if what I put there before has been mostly broken down then I'll add a little more.
Getting the bin cat-scanned is optional -- for the worms. Maybe not for the cat.


10 comments:
Looks great.
OK if I link to this from my garden blog?
M
Hi Martha. Yes, please do!
angie
Hi Angie!
Neat bins!
Could you tell me where you got your worms?
Hi Ann. There are two places where we've been getting worms: Paul's Bait & Tackle on Chippewa, and Denny Dennis Sporting Goods in Fenton.
Ask for "red wigglers," and if they give you a choice between the small and large ones, choose the small ones.
If anyone is looking at this a year later then Denny Dennis doesn't carry the red wigglers but the number for the man you can buy them from in House Springs is 3146027736. I forgot his name. Nice couple.
If anyone is looking at this a year later then Denny Dennis doesn't carry the red wigglers but the number for the man you can buy them from in House Springs is 3146027736. I forgot his name. Nice couple.
Victoria, thanks for that info. It's been awhile since I bought my worms so that's good to know!
Hi! I'm new to vermicomposting and found this link super helpful. I've actually constructed a bin similar to the Rubbermaid one you have posted, and bought worms yesterday! A question that may seem silly: with every addition of scraps do I give the bin a good stir? Is there an easy way to harvest the castings?
Thanks!
Chris
Hi Chris. I try to stir up my bin once every week or two, but I don't do it after each addition of food. Sometimes I'm lazy and just lift the lid, throw it in, and close it back up, and sometimes I'm good and bury the scraps.
Harvesting is a bit messy, especially if the castings are on the wet side. I got a compost strainer and use that. I did find someone on Twitter who harvests her vermicomposting by just piling it up in a little Red Flyer wagon, letting the worms crawl to the middle of the pile (they'll avoid light), then she just takes handfuls from the top and uses it in her garden. That sounds a lot easier than screening!
I'm just setting up a worm composting bin and found your instructions on how you made a bin so very helpful and sensible. Thank you!
Post a Comment