Friday, August 8, 2008

Fairy Ring


There's a fairy ring growing between my neighbor's driveway and mine. It gets more mushrooms as time passes but I thought I'd get a photo while I'm thinking of it.

Here's a better view, taken after a different rainstorm. Note how lush the grass is in the middle. As the fungus grows, it dies out in the center and decays, feeding the soil.

Sunday, August 3, 2008

Dog Vomit Fungus


Yesterday was a busy day for my camera. While (unsuccessfully) chasing the snake the first time we saw it, I came across some weird-looking fungus that I've seen in my yard before. Since I had the camera for the snake chase, I went ahead and snapped some pics.

This fungus isn't a mushroom, but a slime mold. The name, though disgusting, is very descriptive (I didn't make it up!). More information can be found here, here,and here.

Black Rat Snake

One of my rules of blogging is to never post something that I'd be afraid for my parents, friends, or employers to see. I'm about to break that rule.

My mother doesn't yet know about this blog. It's bad enough that my little brother ratted me out about the worms in my kitchen. I showed them to my father last time they visited and he thinks it's cool, but I knew it would just ekel my mother. I'm afraid if she sees this photo she'll never come to visit again.


We've seen him before, but this time we got a better look since he was right outside our back door, and I think it's a Black Rat Snake rather than a Black Racer Snake. The main differences are: the Rat Snake is chunkier, shiner, slower, and less aggressive than the Racer. I believe the definitive proof would be if we could see the coloring on his underside, but I don't think either Doug or I are going to ask him to show us.

Zucchini recipes

I spent about 3 hours cooking last night: two types of zucchini bread, and stuffed zucchini rounds. Everything was experimental, and not everything turned out the way I had hoped (the low-fat raspberry-zucchini bread was particularly disappointing so I won't post a recipe for it). The garlic cheese zucchini bread, however, was excellent! I messed around with a recipe I found here, and it was so easy I didn't even need a mixer.


Garlic Cheese Zucchini Bread


2 eggs
1 cup buttermilk
1/3 cup sugar
1/3 cup butter, melted
1 teaspoon salt
1/2 teaspoon baking powder
1/2 teaspoon baking soda
3 cups all-purpose flour
1 cup grated zucchini
1 tablespoon grated onion
2 cloves garlic, minced
1/2 cup grated sharp cheddar cheese

Beat together the eggs, buttermilk, sugar, and butter. Mix in the salt, baking powder, and baking soda. Mix in the flour until it's moist (don't over-mix).

Stir the garlic and onion into the zucchini, then fold the zucchini mixture into the batter. Stir in the cheese.

Pour into two 4 x 8 loaf pans, and bake at 350 for ~45 minutes, or until a toothpick comes out clean. The top will still be pale, or just slightly golden.

Stuffed zucchini rounds


My next experiment was another stuffed zucchini. I usually make a loose stuffing, browning some meat & onions, then adding to a grain of some sort (brown rice, bulgar, couscous, quinoa or whatever's on hand). This time I decided to go for more of a solid, meatloaf-type filling, and to cut the zucchini into rounds instead of lengthwise to make serving easier.

Consider this more of an idea than a recipe; I can't remember what all I used to spice it. As an afterthought, I added a garlic spice mix that I received in my last Fair Share, and I didn't catch that the mix's top ingredient was salt. Because I had already done some seasoning, the result was way too salty.

1/2 to a whole large zucchini (depending on size)
1 pound ground buffalo (or ground beef)
1 medium onion
1 green pepper
olive oil
chicken broth
1-2 cups cups cooked quinoa, rice, or bulgar
1 egg
1 packet unflavored gelatin
seasoning to taste (use what you would for a meatloaf)
shredded cheddar

From a large zucchini, cut several ~2 inch rounds. Scoop out the center (save what you scoop out), place in a pan with a little chicken broth in the bottom, and bake at 350 for about 30 minutes or until the flesh is soft (not soggy).


Prepare the gelatin per package directions just prior to mixing the stuffing. If you prepare it too far in advance it'll be set up already, but you want it to be liquid.

Sautee the onion and pepper in a little olive oil. Dice the zucchini that was scooped from the rounds, along with any leftover zucchini that wasn't cut into rounds. Sautee with the onion/pepper mix. When stuffing a zucchini, I go ahead and sautee any squash that I have left. If it looks like too much, add to any leftover grain with a little cheese and some seasonings and cook it along with the stuffed zucchini.

Mix the raw ground meat, grains, seasoning, and sauteed vegetables in a large bowl. Add the egg, and add about 3 tablespoons of the prepared gelatin, which will keep the stuffing from drying out while cooking. Stuff the hollowed-out parts of the squash rounds, and form into a semi-circle on top.

Bake at 375 until a meat thermometer inserted into the stuffing reads 155. Start checking temperature after about 40 minutes. If the tops start to look dry, then cover loosely with foil.

Saturday, August 2, 2008

Summer Zucchini


I've had zero success with tomatoes this year. I only planted 4 plants, and they must have been a variety not well-suited to my area; I had a much easier time of it last year. However, with just two zucchini plants -- one in a pot and one in the ground -- I've already had plenty of zucchini. It seems the only way to find the ones big enough for stuffing is to befriend a gardener, or to grow them yourself. The last one I stuffed (I forgot to take pictures!) was so big that I had to cut off the ends to fit it on the cookie sheet!

Here's the plant that makes the giant squash:

Monday, July 7, 2008

Vermicompost (worm compost)

I wrote this awhile back on my other blog, but am pasting most of it here because it's garden-related. I've been vermicomposting indoors for about two years now, and occasionally someone asks me how to start. So here's how my favorite bin was made:

I started out with two Rubbermaid bins. I have removed the labels long ago so I can't tell you how many gallons they are, but they are approximately 16" x 20" x 9" deep.

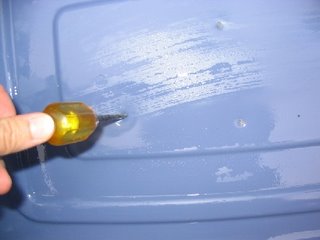
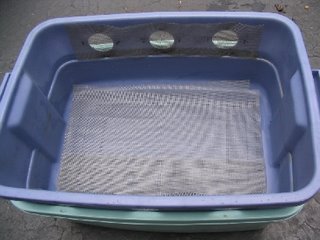
I drilled three large holes in each side near the top of one of the bins, and stapled window screen material over the holes. If I had to do it over again I'd bond the screening on using some silicone caulking material. If you do that, make sure you let the caulking cure for awhile (I'd give it a week) until it no longer smells like vinegar.


Punch several holes in the bottom of the same bin that has the other holes so any excess water can drain.


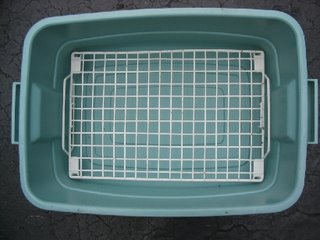
You will end up stacking the bin with the holes on top of the second bin. However, you will probably need to put something in the bottom of the intact bin so they don't nest too tightly together: you don't want to block the screened holes from the first bin. I found a small dish shelf, but you could just as easily line the bottom with a few rocks. Don't make it too heavy or your bin won't be very portable.


Stack the two bins together and lay some screening material in the bottom of the top bin to keep the worms from falling out of the drain holes.


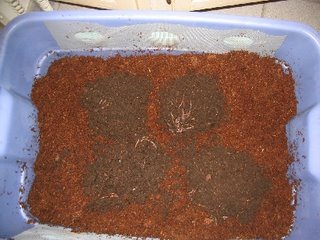
Now it's time to fill up your bin. I used coir (expanded in water to the consistency of a moist sponge) as my main bedding material. I usually keep some of this material around to make potting soil (I hate potting soil with peat moss), so it was handy. I made that initial layer several inches deep, then buried some of my kitchen scraps in it. Don't use meat or dairy, but fruit & vegetable scraps, coffee grounds, tea bags, etc. are ok. I also added a little bit (~1/2 a trowel full) of compost from my pile outside to help the kitchen scraps break down more easily. Add some water until the coir is damp: worms need moisture to survive. Then dump your worms on top. I used 500 red wigglers I bought from a bait shop. If they have two different types of red wigglers, get the small ones: they are cheaper, and they are supposed to be better for composting.


I shredded some newspaper on top of the coir, and sprayed it with water. That seems to keep the coir from drying out too fast, and it's more material for the worms to work on. You may want to keep the lid off for a couple hours in a brighly lit room to make sure the worms dig down into the coir instead of trying to crawl out of the bin. They seem to get confused when they're first put in there, and if the bin is in the dark right away they are just as likely to crawl up the side of the container -- or out the screened holes -- as they are to dig down. Once they made it into the coir I haven't had any problems with escapees.

How much do you feed your worms? I have yet to measure anything so I can't give you a precise answer. You want to make sure whatever you add can be buried within your bedding material because you don't want to stink up the place or overwhelm the worms. I've been checking the bin every few days and if what I put there before has been mostly broken down then I'll add a little more.

Getting the bin cat-scanned is optional -- for the worms. Maybe not for the cat.

Natural Pest Control -- Slithery Edition

The moles (voles?) have been taking a toll on our lawn this year. Strange patterns are written all over in dead grass, where their tunnels have disturbed the roots enough to kill it. Since we're organic, we won't poison them. We don't like killing things anyway, which makes them hard to control.

Yesterday I found out that help is already on its way.


"Help," in this case, is in the form of a 3 to 4 foot long black snake. I didn't get a good enough look for positive identification. It's either a black rat snake or a black racer. In my book, a snake that size is "giant," especially when I almost stepped on him, and of course my first reaction was to scream. His response was to vibrate his tail really fast, mimicking a rattler (I've since read that is pretty common among non-venomous snakes). My second reaction was to bang frantically on the back door until my husband came out. I needed him out there not to protect me, but to keep an eye on where the snake went while I ran for my camera. The slithery one is living in a hole in the flower bed next to my kitchen window, and unfortunately was most of the way home before I had a chance to snap the pic.

When we bought this house a year and a half ago, the yard was beautifully kept but, like most suburban yards, it seemed so.... sterile. We didn't even have that many squirrels last summer. Not that we need a lot of squirrels! But with our previous yard we just grew used to having all sorts of animals around (eventually I even came face to face with the coyote that was sleeping in my compost pile!) and it made the view out the back window much more interesting.

In the time we've been here, though, we've been seeing steadily more wildlife, thanks no doubt to the bird feeders and the lack of poisons. In addition to the snake, another newcomer is a chipmunk we spotted this weekend on our back porch. In addition to the chipmunk and snake, here are the other creatures we've encountered out back:
- Lots of birds, most are common ones (sparrows, robbins, finches, starlings, etc.)
- Woodpeckers: downy and flicker
- An unidentified hawk or two
- An occasional owl passer-by (never to be seen, only heard)
- Raccoon
- Squirrels
- Rabbits (although none in the back yard this year... maybe because of the snake)
- Moles (or voles... I don't know how to tell the difference)
- Mice

Some of the critters are pests, but once you make your yard inviting to urban wildlife, you don't exactly get to choose which wildlife must remain on the other side of the fence. So we take the "bad" with the good. And it's always interesting to see what nature sends around when the "bad" starts to get out of hand.