Monday, July 7, 2008

Vermicompost (worm compost)

I wrote this awhile back on my other blog, but am pasting most of it here because it's garden-related. I've been vermicomposting indoors for about two years now, and occasionally someone asks me how to start. So here's how my favorite bin was made:

I started out with two Rubbermaid bins. I have removed the labels long ago so I can't tell you how many gallons they are, but they are approximately 16" x 20" x 9" deep.

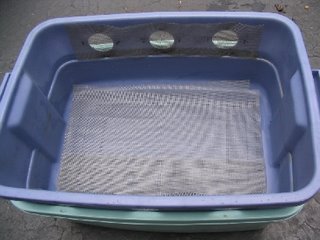
I drilled three large holes in each side near the top of one of the bins, and stapled window screen material over the holes. If I had to do it over again I'd bond the screening on using some silicone caulking material. If you do that, make sure you let the caulking cure for awhile (I'd give it a week) until it no longer smells like vinegar.


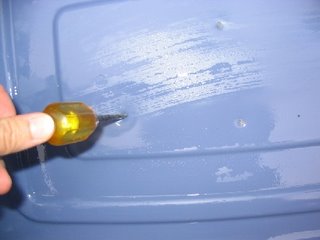
Punch several holes in the bottom of the same bin that has the other holes so any excess water can drain.


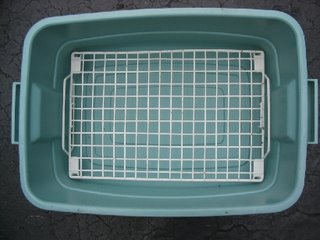
You will end up stacking the bin with the holes on top of the second bin. However, you will probably need to put something in the bottom of the intact bin so they don't nest too tightly together: you don't want to block the screened holes from the first bin. I found a small dish shelf, but you could just as easily line the bottom with a few rocks. Don't make it too heavy or your bin won't be very portable.


Stack the two bins together and lay some screening material in the bottom of the top bin to keep the worms from falling out of the drain holes.


Now it's time to fill up your bin. I used coir (expanded in water to the consistency of a moist sponge) as my main bedding material. I usually keep some of this material around to make potting soil (I hate potting soil with peat moss), so it was handy. I made that initial layer several inches deep, then buried some of my kitchen scraps in it. Don't use meat or dairy, but fruit & vegetable scraps, coffee grounds, tea bags, etc. are ok. I also added a little bit (~1/2 a trowel full) of compost from my pile outside to help the kitchen scraps break down more easily. Add some water until the coir is damp: worms need moisture to survive. Then dump your worms on top. I used 500 red wigglers I bought from a bait shop. If they have two different types of red wigglers, get the small ones: they are cheaper, and they are supposed to be better for composting.
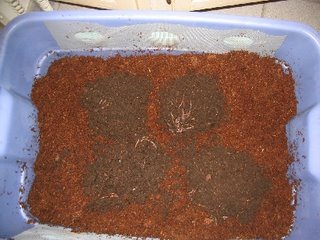


I shredded some newspaper on top of the coir, and sprayed it with water. That seems to keep the coir from drying out too fast, and it's more material for the worms to work on. You may want to keep the lid off for a couple hours in a brighly lit room to make sure the worms dig down into the coir instead of trying to crawl out of the bin. They seem to get confused when they're first put in there, and if the bin is in the dark right away they are just as likely to crawl up the side of the container -- or out the screened holes -- as they are to dig down. Once they made it into the coir I haven't had any problems with escapees.

How much do you feed your worms? I have yet to measure anything so I can't give you a precise answer. You want to make sure whatever you add can be buried within your bedding material because you don't want to stink up the place or overwhelm the worms. I've been checking the bin every few days and if what I put there before has been mostly broken down then I'll add a little more.

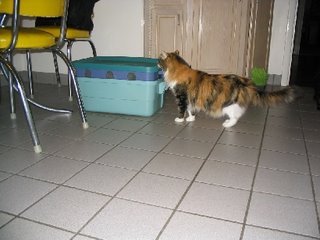
Getting the bin cat-scanned is optional -- for the worms. Maybe not for the cat.
Natural Pest Control -- Slithery Edition

The moles (voles?) have been taking a toll on our lawn this year. Strange patterns are written all over in dead grass, where their tunnels have disturbed the roots enough to kill it. Since we're organic, we won't poison them. We don't like killing things anyway, which makes them hard to control.

Yesterday I found out that help is already on its way.


"Help," in this case, is in the form of a 3 to 4 foot long black snake. I didn't get a good enough look for positive identification. It's either a black rat snake or a black racer. In my book, a snake that size is "giant," especially when I almost stepped on him, and of course my first reaction was to scream. His response was to vibrate his tail really fast, mimicking a rattler (I've since read that is pretty common among non-venomous snakes). My second reaction was to bang frantically on the back door until my husband came out. I needed him out there not to protect me, but to keep an eye on where the snake went while I ran for my camera. The slithery one is living in a hole in the flower bed next to my kitchen window, and unfortunately was most of the way home before I had a chance to snap the pic.

When we bought this house a year and a half ago, the yard was beautifully kept but, like most suburban yards, it seemed so.... sterile. We didn't even have that many squirrels last summer. Not that we need a lot of squirrels! But with our previous yard we just grew used to having all sorts of animals around (eventually I even came face to face with the coyote that was sleeping in my compost pile!) and it made the view out the back window much more interesting.

In the time we've been here, though, we've been seeing steadily more wildlife, thanks no doubt to the bird feeders and the lack of poisons. In addition to the snake, another newcomer is a chipmunk we spotted this weekend on our back porch. In addition to the chipmunk and snake, here are the other creatures we've encountered out back:
- Lots of birds, most are common ones (sparrows, robbins, finches, starlings, etc.)
- Woodpeckers: downy and flicker
- An unidentified hawk or two
- An occasional owl passer-by (never to be seen, only heard)
- Raccoon
- Squirrels
- Rabbits (although none in the back yard this year... maybe because of the snake)
- Moles (or voles... I don't know how to tell the difference)
- Mice

Some of the critters are pests, but once you make your yard inviting to urban wildlife, you don't exactly get to choose which wildlife must remain on the other side of the fence. So we take the "bad" with the good. And it's always interesting to see what nature sends around when the "bad" starts to get out of hand.

Sunday, June 15, 2008

Fool-proof Produce

If you are a beginning gardener and you want to grow vegetables, I recommend trying lettuce and zucchini. Both are easy to grow here in the St. Louis area, and neither one requires a huge investment in time or energy.

It's too late in the season to plant any more lettuce: I just harvested the last of the crop I planted last winter. Although technically I think you're supposed to wait until later in the winter, I planted leaf lettuce seeds in February and they did just fine, even though we had plenty of cold and snow. Once the seedlings came up, I fed them every couple of weeks with alfalfa meal and tried to keep the clover out of the bed. Other than that, not much maintenance is required. If you plant from seed, don't worry about neat little rows: when it's time to thin the lettuce you can eat the little plants you pull up.

Last year my first zucchinis ended up rotting on the vine (has to do with uneven watering and weird weather conditions), but the second round was pretty prolific. However, the continuous moisture this year means that the first round of flowers on my plants are actually producing fruit. I have two plants I got from a nursery and put in the ground two weeks ago, and each one already has a small zucchini. Several other flowers are blooming right now, so the females should turn into fruit this week as well.

I have been feeding my zucchini with alfalfa meal for the nitrogen, and Jamaican bat guano (available at Worm's Way) for the phosphorus. Phosphorus is necessary for good flower and fruit production. I don't feed on a particular schedule: just whenever I think about it, every other weekend or so. They are extremely prolific, and two plants should end up providing plenty of zucchini for two people for the whole summer.

Sunday, May 18, 2008

Bad Brassicas

Earlier this spring I planted broccoli, along with a bunch of other brassicas (stuff related to cabbage). Although little heads started to form, they got leggy and tall and went to seed before ever really developing.

Along with my skinny, flowering broccoli I planted cauliflower -- which hasn't formed any heads yet -- and cabbage, which is still a collection of loose leaves. My Brussels sprouts have also yet to show anything more than a few loose leaves, although I'm pretty sure that my husband has been beaming bad thoughts to the Brussels sprouts every time he's outside, so maybe it's working. ;)

I haven't grown most of these plants before so I thought it was something I did wrong, but I was at a gardening class yesterday and found others who are in the same boat. We speculate that the weather this spring may be the culprit. I don't know if the amount of water was a problem, or maybe it was the lack of sunshine. Other than the lack of vegetables, the plants seem to be pretty happy so I guess I'll just wait and see if they do anything before the weather turns too hot.

Monday, April 21, 2008

Happy Earth Day

St. Louis has a big Earth Day Festival each year, but we missed it today. The weather was just too nice not to spend it in our own yard. Doug raked acorns and de-thatched* the front yard, while I started on a wine bottle border for one of our garden beds. I managed to get all of my food plants fed and mulched today as well, so I feel I've accomplished something.

In early spring, just before the first time you mow, you may notice a lot of little purple violets in your yard. It blows my mind that so many people think of them as weeds: I think they're beautiful. The leaves and flowers are also edible (provided you do not use synthetic fertilizers, pesticides, or herbicides on your lawn). They taste mild, like a lettuce, and they make for a beautiful salad!

As with most plants, violets seem to look fresher if you pick them in the morning. If you're not going to eat them right away, place them in a bowl and cover with cold water. They'll keep that way for hours, maybe longer but I've never tried. I use a "Salad Spinner" to dry them before use. That's all the prep you need: even the flower stems are edible.


* When you've been organic for awhile, you shouln't have to de-thatch your lawn. However, we're in transition since we have only been here 18 months, and the lawn has suffered from years of high fertilization and short mowing: a perfect recipe for thatch.

Monday, April 7, 2008

Fabulous Weekend!

The calendar says spring started weeks ago, but this was really the first weekend of spring in the St. Louis area. We had two perfect days (60's & 70's), and trees everywhere are in bloom!

The nurseries are starting to get a better selection of plants, so I picked up a columbine, a calla, and a few gerber daisies to fill in some areas of the yard. I planted brussels sprouts, garlic, cauliflower, and onions in a bed that my husband double-dug for me a few weeks ago. I don't know how I'm going to line the raised bed (wood? bricks? bottles?) or what its final shape will be, so instead of letting it sit there while I make up my mind, I just planted it. Most of the veggies in there will be through by mid-summer so I can deal with how the bed should look then. At least it no longer looks like a grave!

Other beds got cabbage, broccoli and lettuce. Some spinach that I planted in the fall and gave up on seemed to spring up overnight, and we ended up eating two bunches of it with dinner yesterday. A bunch of the vegetable transplants ended up in flower beds. I love mixing flowers and veggies!

I also made some progress on planning for the garden club. No details yet, but it looks like things may get off the ground in July.

Sunday, March 23, 2008

Images for bloggers

I came across this site while reading a web analytics (that's my day job) blog, and thought I'd try it out. The site is called PicApp (www.picapp.com), and it provides legal copyrighted photos for use on blog sites, in exchange for some advertising embedded in the photos. They do have some gardening photos so I thought I'd give it a try.

My disclaimer is that I have no control over what they advertise, so obviously I don't endorse anything you might see in the ad.